We have gone over a few different flows, including a client experience tracker, but let’s take it just a little bit farther. Today, we are going to use similar ideas to build out something that every organization needs: a vacation tracker. Everyone needs to take a day off, and we need to be able to track who is off, and when. Vacation trackers when bought online, can cost you up to 50 bucks a month, but why do that when you already have Microsoft 365 licenses. We are going to make a form asking which day they want off, then an approval that will be sent to management, and then finally add it to a list.
Building Our Form
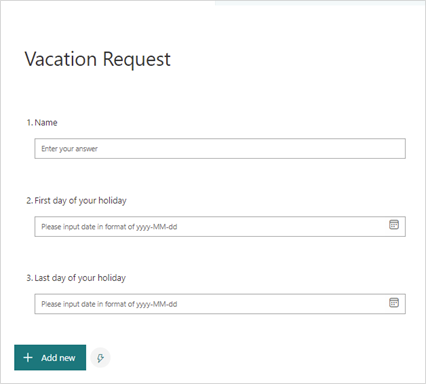
We have done this quite a few times (I may be a pretty big fan of forms), so we are just going to quickly go over what our requirements are going to be. Our form is going to require only two things, the first day of the holiday, and the last day of the holiday. Because of how the flow works, we are also going to get them to fill in their name, for simplicity's sake. The form is going to look like this:
Creating Our List
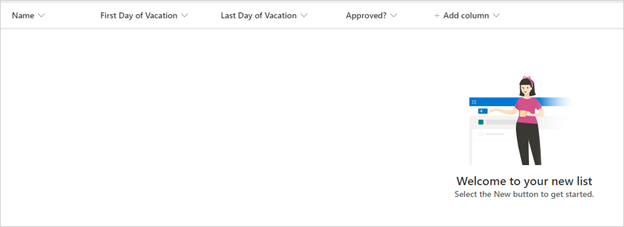
The next thing that we are going to need to create is our list. We have gone over list creation in the past, so if you aren’t sure, take a look at getting started with Microsoft Lists. This is going to be a list that can be accessed by everyone internally, to be able to verify who is taking what day off. This list can be put in a SharePoint site as well, making it easy to access. Create your list, and the fields that we are going to have is going to be “Name” which will be a single line of text column, “First day of Vacation”, “Last day of vacation” which will both be date columns and “Approved?”, which will be a yes/no column. Let’s put our list together, and it's going to come out looking like this:
Creating Our Flow
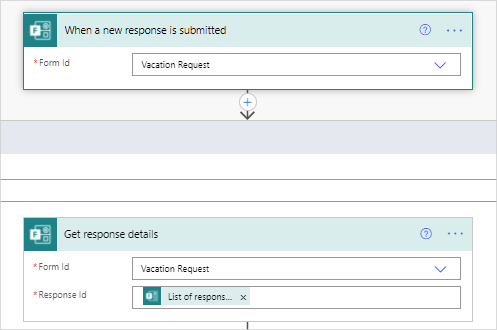
Now for the bread and butter of all of this, and to pull together all of our setup, we need to create our flow. Luckily enough for us, there is a template that we can use, with a few adjustments. The template is “Send form responses for approval”. Search for that, and you will get the Flow you need. Once you have selected it, you will see that most of it is filled out. The only things that we are going to need to do is make sure it is pointing to the correct forms and lists, and make sure that we are sending an email if they are approved or denied. To start, we are going to point to our form in the first fields.
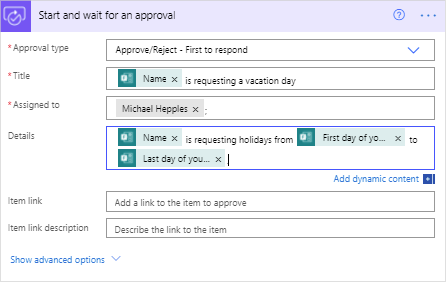
Now, we are going to put together the approval. Our title is going to be pretty clear, we want it to be (user) is requesting a vacation day. So start by using the response details to pull the name field that was filled out, and then adding our “is requesting a vacation day”. Now, we do need to select who it is being assigned to. For this instance, we are only going to send it to one person, but you can always adjust that, and send it to numerous people. For this example, we are going to send it to Michael. The last thing that we will want to do is provide the details. We will want to reiterate who is taking vacation, and when they would like it for. In the details field, we are going to enter: “Name variable” is requesting holidays from “First day of your holiday” to “Last day of your holiday”. Your approval is going to look something like this:
The condition that we need to create has already been made for us, so we just need to fill that out. We are going to start on the “If yes” side. This is where we are going to create our list item, and send the user an email stating that they have been approved. The create item is already in the condition, so we just need to fill it out. Point it at your site, and find the list. You are required a title, but that is a hidden cell in our sheet, so we will just put it as our “approval ID” if we need to reference it later. We will now just fill out the rest with our dynamic content. If your dynamic content isn’t showing up, note that you can click on the see more besides which piece you are looking for. Our Create an item will look like:
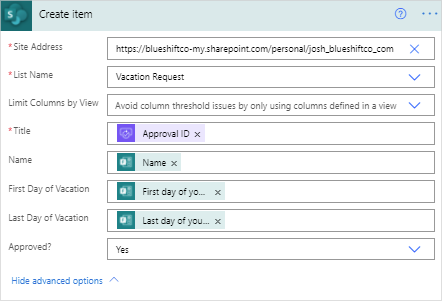
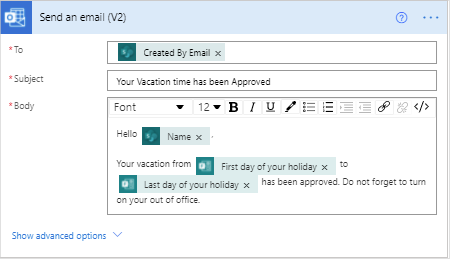
The last part that we are going to do is provide the employee with an email stating that it has been approved, and they are good to go. To do this, select “add an action” under your list item, and select “send an email (v2)”. Now, just fill it out with everything that you have before, and you will be good to go.
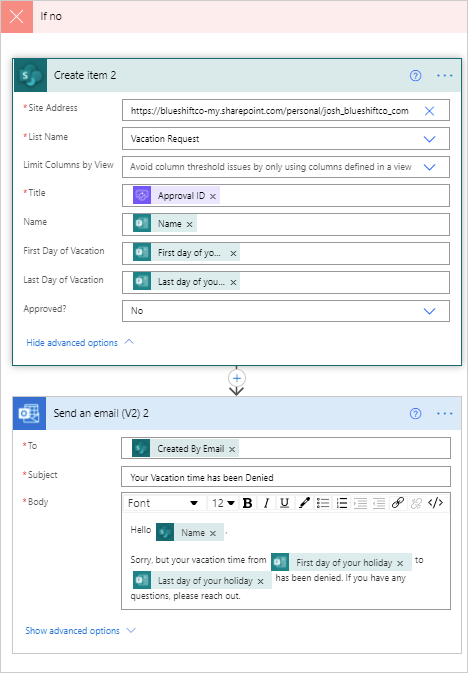
The last piece is if the approval is denied. We will still want to create a list item, and everything is going to be the same, minus the fact that we want to put the answer to approved as no. You will also do the same with the email, but make it a denial. It should look something like this:
There you go, you now have a vacation tracker that can be used with your teams that took less than 15 minutes to build and can save you some money every month! Microsoft 365 has so many different possibilities with all of its tools, that you can start to limit how many monthly subscriptions you have for your business. If you have any other ideas and want to make them a reality, contact us and we can help you build them.


