Mistakes are bound to happen, we are only human after all. Microsoft 365 is a place that mistakes can be very common. On the plus side, the typical ones are just small slips that won't affect anything to do with our workflow, besides looking a little bit goofy to our team members. Let’s take a look at a few common mistakes, and how we can avoid, or fix them.
Sending a Message in the Wrong Chat
I have done this numerous times before. You are in a rush, you need to get a quick message off while you are doing 100 different things, and you accidentally send it to a group chat, or a teams channel, because you were not paying much attention. Hopefully, you weren’t having a personal conversation while trying to send this message, but it is a very easy fix!
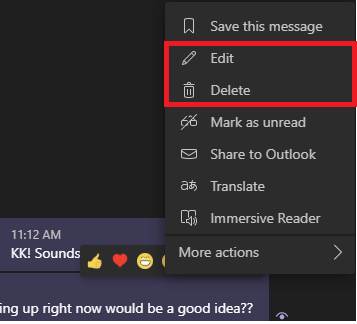
Microsoft Teams has delete and edit message feature. Deleting or editing a message is as easy as clicking on the “…” beside our message, and then clicking either Delete or Edit.
Note: This feature might not be available to you, depending on the policies and settings of your tenant.

When we edit or delete a message, the people on the chat (whether it be one of our Teams or a one-on-one conversation) will be made aware that we've edited or deleted something. Below we will see an example of an edited message and a deleted message.


Overwriting a Shared Document
We have all been in the issue where a file gets shared out, and someone makes a huge change. Typically revolving around deleting a section without realizing, or making a change on the document that they thought was only saved locally.
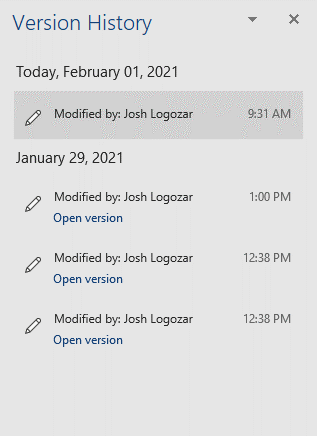
Luckily, document libraries in Microsoft 365 have versioning on by default. This means that any changes that have been made to a file can be rolled back to a previous saved version! The fastest and easiest way to do this would be to simply click into “File” then into "Version history".

We will then get a list of previous versions, and we can select which one we would want to open. Review the document to verify that it is the version that we want, and then save it again.

Accidently Turning on Your Camera
With online meetings, it's always nice to be able to see the people who we're meeting with. Microsoft Teams has made that incredibly easy using video in meetings. However, every now and then we might accidentally turn our camera on during a meeting, and we may not realize it.
This can be an incredibly embarrassing moment if we have something that might be going on behind us, or perhaps we just haven’t had our morning coffee yet! There is sadly not a lot of ways that we can do make sure our camera isn’t on, but with the introduction of the Pre-Meeting screen, we get an additional step to decide if we want our camera on or off. From there, all we need to do is click on the camera toggle before actually joining the meeting.

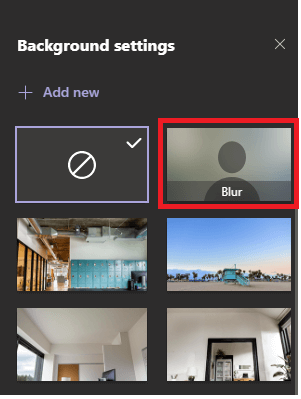
The other thing that we can do is use the background blur feature. We have discussed how to use backgrounds in the past, but one thing we didn’t discuss is that once we put a background on, it will stay on until we turn it off. This means that it will remain up from meeting to meeting.
If we have quite a few people in your workspace, or distractions behind us may be a concern, simply use a blurred background. This will make sure that even if we have our camera on by mistake, no one will see what is behind us clearly. For this, we'll need to click on the "Background filters", and then select "Blur", which is the second selection by default.


Note: If you are switching between accounts (such as your kids having to log in for school) the background filters will reset to default. Which means you will have to turn your background blur back on for your next meeting.
Learning From Our Mistakes
These are a few common mistakes when working with Microsoft 365, including ways to either quickly fix them, or ensure that we don’t make them again in the future. Microsoft 365 is flexible enough to make sure that, as long as we're a little bit careful, we'll will never make a mistake that we can't fix on our own, or in the worst case, by your Administrator.

.jpg)

